Clojurescript Next Level

IntroductionLink to Introduction
Last autumn, I wrote a blog post Clojurescript Frontend Development For Novices, in which I described the basic tooling and some hints on how to start Clojurescript development. As the blog post picture suggests, the little dog now has a bigger dog companion: various suggestions for the Clojurescript next-level development. If you haven't read the previous blog post yet, I recommend you to follow that link and read it first - this new blog post continues the Clojurescript Frontend Development saga.
The idea for this second blog post is my new project. We have been implementing an exciting system for our new international customer. I can't tell anything related to the actual product for confidentiality reasons. However, I describe some general Clojurescript, Reagent, and React lessons I learned while implementing the product's frontend application using those tools.
Javascript InteropLink to Javascript Interop
In my previous blog post, I gave a minimal example of Clojurescript's Javascript interop. An excellent summary is in ClojureScript Cheatsheet - I recommend you to read it.
One of the most important things to understand, is to realize that the clj->js function is recursive (recursively transforms ClojureScript values to JavaScript), but #js tagged literal is not. Example:
(clj->js {:columns ["Name" "Status" "Created"]
          :initialState {:pageSize 10
                         :pageIndex 0}})
// =>
#js {:columns #js ["Name" "Status" "Created"],
     :initialState #js {:pageSize 10,
                        :pageIndex 0}}
and
#js {:columns ["Name" "Status" "Created"]
     :initialState {:pageSize 10
                    :pageIndex 0}}
// =>
#js {:columns ["Name" "Status" "Created"],
     :initialState {:pageSize 10,
                    :pageIndex 0}}
are not the same thing. The second example converts only the outer map into a Javascript object. So, you have to fix the second example like this:
#js {:columns #js ["Name" "Status" "Created"]
     :initialState #js {:pageSize 10
                        :pageIndex 0}}
// =>
#js {:columns #js ["Name" "Status" "Created"],
     :initialState #js {:pageSize 10,
                        :pageIndex 0}}
This bit me a few times until I understood the difference.
Another weird Clojurescript/Javascript interop feature is that you can mix Clojure and Javascript data structures. I didn't know this until Juho explained this to me (I can't emphasize enough just how great it is to have the Reagent maintainer working in the same company). Example:
...
(let [data-head ["Name" "Status" "Created" "Created_by"]
      data-rows (map (fn [p] {"Name" (:id p)
                              "Status" (:status p)
                              "Created" (:date p)
                              "Created_by" (:user p)}) (:my-data @state/state))
...
      columns (react/useMemo
                (fn [] (apply array (for [header data-head]
                                      #js {:Header header
                                           :accessor (fn [row index] (get row header))})))
               #js [data-head])
      data (react/useMemo
             (fn [] (apply array data-rows))
             #js [data-rows])]
What's happening here? data-rows: we first create a Clojure sequence that comprises Clojure maps. Then we create the data React hook (apply array data-rows): we apply the Clojurescript array function to the data-rows to get a Javascript array (as the react-table requires).
Note that the elements inside this Javascript array are still Clojure maps (cljs.core/PersistentArrayMap to be precise)! And the react-table column accessor uses the Clojure get function ( (fn [row _] (get row h)) ) to access the value of these Clojure map elements (the row) indexed by the column. So, you can happily mix Clojure and Javascript data structures in your Clojurescript code!
This example also demonstrated the React Hooks usage: (react/useMemo ...) in Clojurescript - the same as you use it on the Javascript side.
There are many little Clojurescript/Javascript interop things like these - you can learn them on a need basis from various examples. Remember to ask for help from your more experienced Clojurescript colleagues or ask for help, e.g., in the Clojurians Slack.
Using React ComponentsLink to Using React Components
It is straightforward to use React components in your Clojurescript frontend. I gave an example using the react-select component in my previous blog post. Let's provide a more next-level example using a more complex React component, react-table. The latest react-table version 7 is a headless re-written version of the previous version 6 (see: What is a "headless" UI library?). The headless React component doesn't render or supply any UI elements - only application logic (like sorting, navigation, etc.) It is your responsibility to provide your component's user interface look and feel.
How to use the react-table in Clojurescript? First setup shadow-cljs and then add the dependency to your Clojurescript frontend project's package.json:
    "dependencies": {
      ...
        "react-table": "^7.7.0"
    }
Then in the Clojurescript namespace in which you use the react-table, require it:
(ns proto-viewer.ui
  (:require ...
            [reagent.core :as r]
            [reagent.dom :as rdom]
            ["react" :as react :default useMemo]
            ["react-table" :as rt :default useTable]
...
Read the react-table documentation, especially the react-table examples. You learn quickly to read the Javascript code examples and convert them to Clojurescript.
In this example react-table sorting we create a sortable header row for the table:
  const {
    getTableProps,
    getTableBodyProps,
    headerGroups,
    rows,
    prepareRow,
  } = useTable(
    {
      columns,
      data,
    },
    useSortBy
  )
...
    <>
      <table {...getTableProps()}>
        <thead>
          {headerGroups.map(headerGroup => (
            <tr {...headerGroup.getHeaderGroupProps()}>
              {headerGroup.headers.map(column => (
                // Add the sorting props to control sorting. For this example
                // we can add them into the header props
                <th {...column.getHeaderProps(column.getSortByToggleProps())}>
                  {column.render('Header')}
                  {/* Add a sort direction indicator */}
                  <span>
                    {column.isSorted
                      ? column.isSortedDesc
                        ? ' 🔽'
                        : ' 🔼'
                      : ''}
                  </span>
                </th>
              ))}
            </tr>
...
Same using Clojurescript:
  (let [table-config {:columns columns
                      :data data}
        ^js table (rt/useTable (clj->js table-config) rt/useSortBy)]
...
     [:<>
      [:r> "table" (.getTableProps table #js {:className "rtable-main"})
       [:thead
        ; HeaderGroup
        (for [^js hg (.-headerGroups table)]
          (let [hg-props (.getHeaderGroupProps hg)
                headers (.-headers hg)]
            ^{:key (.-key hg-props)}
            [:r> "tr" hg-props
             ; HeaderColumn
             (for [^js hc headers]
               (let [hc-props (.getHeaderProps hc (.getSortByToggleProps hc))
                     sort-icon (if (.-isSorted hc)
                                 (if (.-isSortedDesc hc) " 🔽" " 🔼")
                                 "")]
                 ^{:key (.-key hc-props)}
                 [:r> "th" hc-props
                  (.render hc "Header")
                  [:span sort-icon]]))]))]
...
Some observations regarding the examples:
-
The React fragment is almost the same on both sides:
<>and:<>(a hiccup keyword on the Clojure side.) -
[:r> "table" (.getTableProps table #js {:className "rtable-main"})is using:r>since we are injecting additional table properties;:r>is a React createElement helper, i.e. you can give Javascript data as parameter (and there is no need forjs->cljconversion). -
Without the table properties, you could have written the HTML table element a bit more concisely by adding the CSS class to the hiccup table key like this:
[:table.rtable-main ...]. -
^{:key (.-key hg-props)}is the React key (see: React keys). -
^jsis an externs inference hint, i.e., the value of this binding is a Javascript data structure. -
On the Clojurescript side, you can use the Javascript interop to access the Javascript object fields and call functions:
(.-isSorted hc)is an interop property access notation. You should read it like this: "accesshcobject'sisSortedproperty."(.getHeaderGroupProps hg)is an interop function call notation. You should read it like this: "call hg object's getHeaderGroupProps function."
Avoiding Rookie MistakesLink to Avoiding Rookie Mistakes
To avoid major rookie mistakes, I strongly recommend reading these two short documents:
Just understanding these two documents well and following the instructions, you should avoid most rookie mistakes. The second document even lists a few typical rookie mistakes to avoid. In this chapter, I'm not reiterating those two documents. Still, I emphasize one particular rookie mistake I stumbled upon a couple of times when implementing the Clojurescript frontend application during my latest project (yep, the same rookie mistake, twice, even though this was already my second Reagent app).
(defn projects-page []
  (let [_ (util/get-projects!)
        projects (:projects @state/state)]
    (fn []
      [:div.pt-6.pl-5
       (if (> (count projects) 0)
         [:f> react-table-wrapper] ; Reads the projects from the same ratom and renders them as a table.
         [:p styles/ch-p-lg "There are no projects"])])))
A rookie mistake. In the outer function, we asynchronously fetch new documents from the backend and store the data into a ratom: state/state. In the inner function, if there are projects, we render them using the react-table. We show the There are no projects message if there are no projects. A rookie might think that the page first shows the There are no projects message (just flashing, possibly 60 ms if the data is coming from some distant AWS data center), and then the table renders. But there is a rookie mistake. The outer function is called only once: the projects binding gets the application's state when there are no projects, and the inner function uses this value. The projects binding never changes. Let's fix it:
(defn projects-page []
  (let [_ (util/get-projects!)]
    (fn []
      [:div.pt-6.pl-5
       (if (> (count (:projects @state/state)) 0)   ; <==== You need to deref the ratom in the inner function!
         [:f> react-table-wrapper]
         [:p styles/ch-p-lg "There are no projects"])])))
If I ever make this rookie mistake again, I will write 100 times on my study's whiteboard: "Does the data change in the React component? Is the ratom dereffed? Check once again!"
BTW. The :f> is mandatory if your React component uses hooks (as the react-table-wrapper does).
Reagent Devtools Next LevelLink to Reagent Devtools Next Level
I explained how you can utilize the reagent-dev-tools in my previous blog post. Let's give an example in this chapter.
(defn dev-tool-panels []
  {:document {:label "Current project"
              :fn (fn [] [util/edn (:current-project @state/state)])}
   :evaluated {:label "Processed project"
               :fn (fn [] [util/edn (process-project (:current-project @state/state))])}})

(defn ^:dev/after-load start []
  (init-routes!)
  (rdom/render [router-component {:router router}
                 (if (:open? @dev-tools/dev-state)
                   {:style {:padding-bottom (str (:height @dev-tools/dev-state) "px")}})]
                (.getElementById js/document "app")))

(defn ^:export init []
  (when state/debug
    (dev-tools/start! {:state-atom state/state
                       :panels-fn dev-tool-panels})) ; <==== show extra panels
  (start))
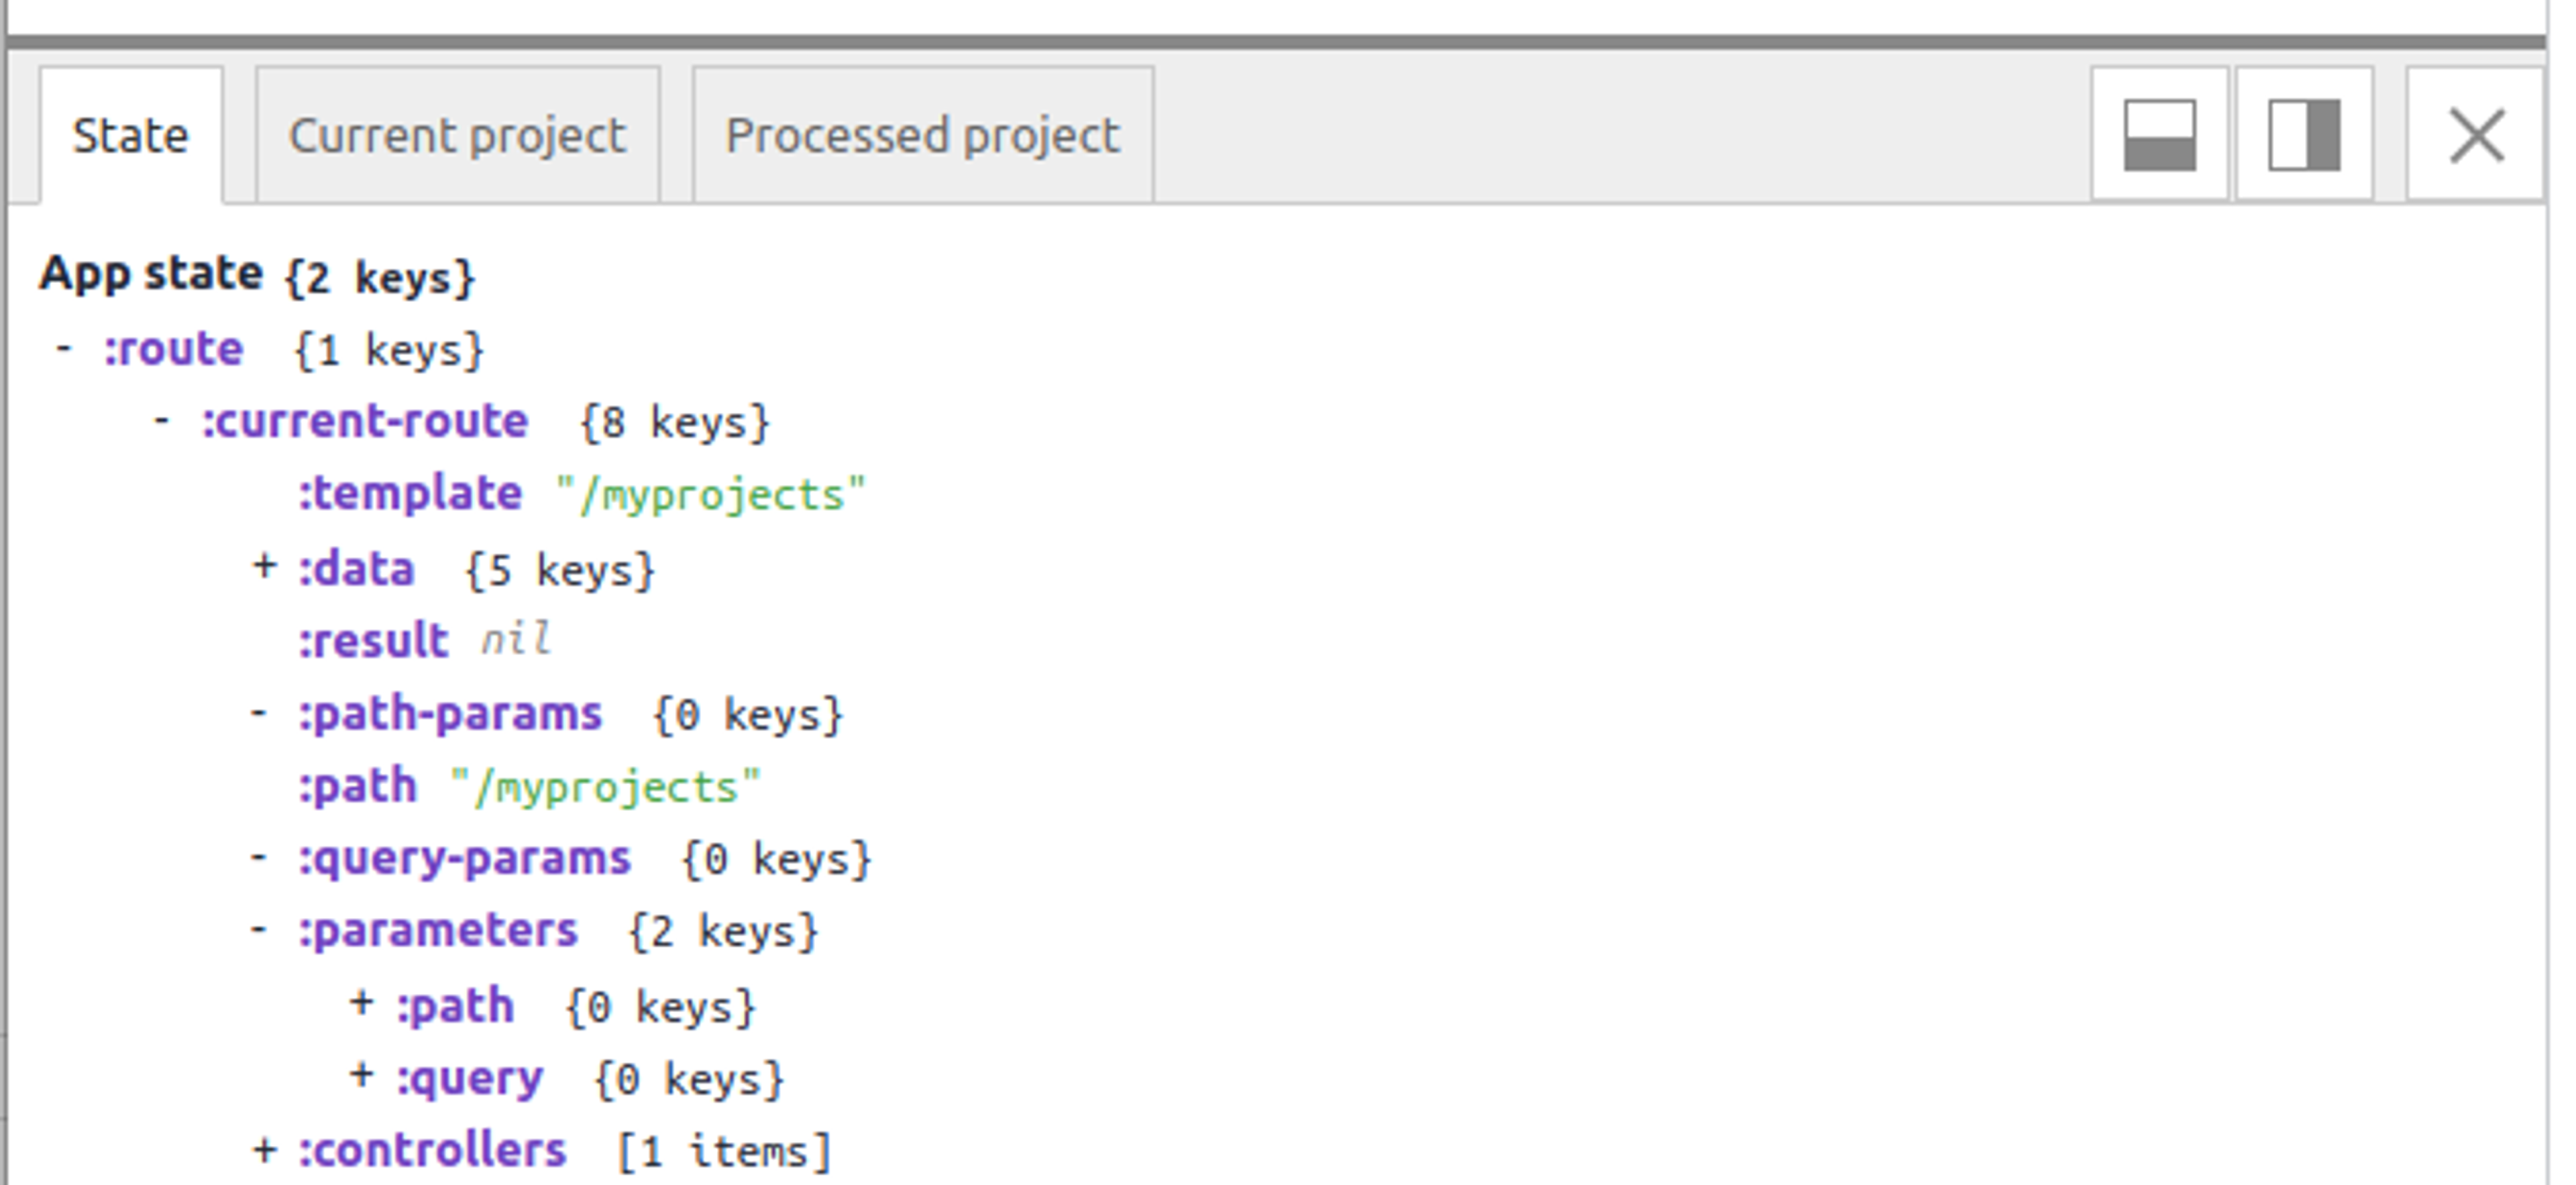
This configuration will show the reagent-dev-tools with State tab and with two additional tabs (Current project and Processed project) at the bottom of every page of your frontend app:

The reagent-dev-tools is an excellent tool for development and debugging purposes. You can hide the panel with the X icon and get it back when you need it. You can register your state ratom (in the example: state/state), and get a nice tree view of your state. And you can add additional tabs to show some extra information you are interested in (like in the example: the edn printout of the current and processed project).
ConclusionsLink to Conclusions
This blog post explained the next level Clojurescript for the novices. Clojurescript's functional paradigm is an excellent fit for React-based frontend applications.
The DogsLink to The Dogs
The blog picture shows my two dogs (left to right):
- Miska is a Samoyed. Miska is five years old and enjoys his life at our house - whenever Miska wants to go out, he walks into my study, puts his pawn on my shoulder - that look means: "Servant, I want to go to the garden, come and open the front door for me."
- Murre is a Miniature Schnauzer. Murre is six months old. Occasionally Murre gives hard times to Miska. But mostly, they are getting along quite nicely.


